Monday, December 31, 2012

Gustavo, Georgie and Fib

I finally finished this piece and named it after my daughters three African fighting frogs. This piece has been in the works for over two years. I would get excited about it, work diligently and then hate it. So it would be put away until I would find it again while looking for something else. Up on the design wall, critique and then figure out what was going wrong with it. The last round was the fact I needed something in my underwater landscape. Enter the frogs.

Closeup of one frog

Here is another closeup

Final finished piece
I really love how this finally turned out. There are so many design techniques and materials that went into this that my hand would go numb typing them up for this post. Let's just say I am extremely happy with the results! Maybe I will enter it into the Celebrate Spring call for entries.

On to my next adventures. My one goal for 2013 is to finally put together a website. Another goal is to start entering my pieces into shows. I need to get back to art again.

Sunday, December 30, 2012

Celebration! - Tiger Lily ATC

Happy New Year! 2012 was a series of highs and lows for me this year and I celebrate them all. Adversity makes us grow while the wonderful events give us pause to celebrate and the momentum to keep moving forward.

Tiger Lily was the color for December and in keeping with my celebratory mood, I used the center of the flower as inspiration. If you look closely, the center looks a little like a fireworks display from an airplane! My other inspiration was the commercial fabric I used for my background fabric. I bought this fabric and quite a bit of it. It seems to find its way into my work now and again. I think it must be the color combination. I reminds me of fall, water and sunlight hitting water. Aqua and orange just vibrate against one another.


I drew in the center using a dye pen in black. To create more explosion and keep with the colors of the flower itself, I painted the centers with poppy red ink using a thin brush. I had to put those black spots in there which reminded me of looking down at people on the ground. They look like little ants! Black puffy paint was used for the spots. The yellow represents the fireworks as they shoot into the sky and right before they explode into beautiful colors. I used a yellow puffy velvet pen for those. Once they were dry, I hit it with a heat gun to puff up the black and yellow. Very cool texture. Instead of using my sewing machine to finish off the edges, I decided to paint them black using textile paint.

This marks the end of our second year of trading ATCs in our group. Please check out the rest of my groups interpretations at www.artsinthecards.blogspot.com

Thursday, December 27, 2012

My Sons 8th Grade Play

Patrick is the "Greaser" on the left


Closeup of Patrick as the Pirate

Mummy costume
Patrick is captaining his ship
September and October 2012 were filled with work and helping with my sons 8th grade play. I signed up to volunteer on costumes and stage. I had never done anything like this before and it seemed like it would be a fun experience. Every year the middle school and the eighth grade class put on a play. It is completely voluntary but most of the class gets involved. If you don't want to be in the play, you can help with props and stage. I had a blast! Little did I know but costumes would be the main focal point of this play. It involved going through many time periods. It was a cross between Teds Excellent Adventure and Back to the Future. My son wanted to participate and told me that he would be doing a small part with one line. They thought better. He had a small role as a Greaser from the 1950's and a more involved role as a Pirate, complete with dance scenes. I think he is a natural!

One of the moms is involved with Mario Triccoci's beauty school and asked students to come and volunteer to do hair and makeup! The play was also video taped and parents ordered copies. I am enjoying mine more frequently than I care to admit to!

All the costumes were recycled from our prop and costume closet. The challenge was to create costumes out of ones we already had on hand. I had to make the mummy costume and used a pair of white cotton draw string pants and one of my husbands shirt put on backwards. I ripped up old pillow cases and sewed them on with my sewing machine. The headpiece was a white baseball cap placed on backwards and more strips of fabric sewn on.  I worked with a terrific group of moms and we had only 6 weeks start to finish to make this happen. Throw in soccer practice, soccer games, a bar mitzvah for his best friend, swim practice and life was real interesting for a while!

Stormy Lake ATC

Wow! This is embarrassing. I haven't posted anything since August. My sincere apologies. My kids, work and life took over. I didn't even participate in two months of ATC trades because of all the events in my life, but I am back on track. I did manage some creative endeavors though and the Lake trade was one of them.

As you know, we have been using colors as our prompts this year. Lake was one I was looking forward to doing. I love all the colors and reflections that are involved in lake.


The base fabric was a commercial brown material that had swirls and spots that reminded me of the bottom of a lake. I took a shimmery dark blue sheer fabric and scrunched it, pinned it in place then sewed it with dark blue thread. I did the same with a light turquoise sheer to finish off the top part. The lake has these colors when a storm is blowing in. I brushed interference blue paint across the tops for a wave like action. The final part was Glossy Accents to add the shine of water on sand and a few seed beads dropped in for texture. This turned out to be one of my favorites that I have done.

Maybe a larger version of this piece would be nice and donate to the swim team for fundraisers!

Friday, August 17, 2012

Sneak Peek

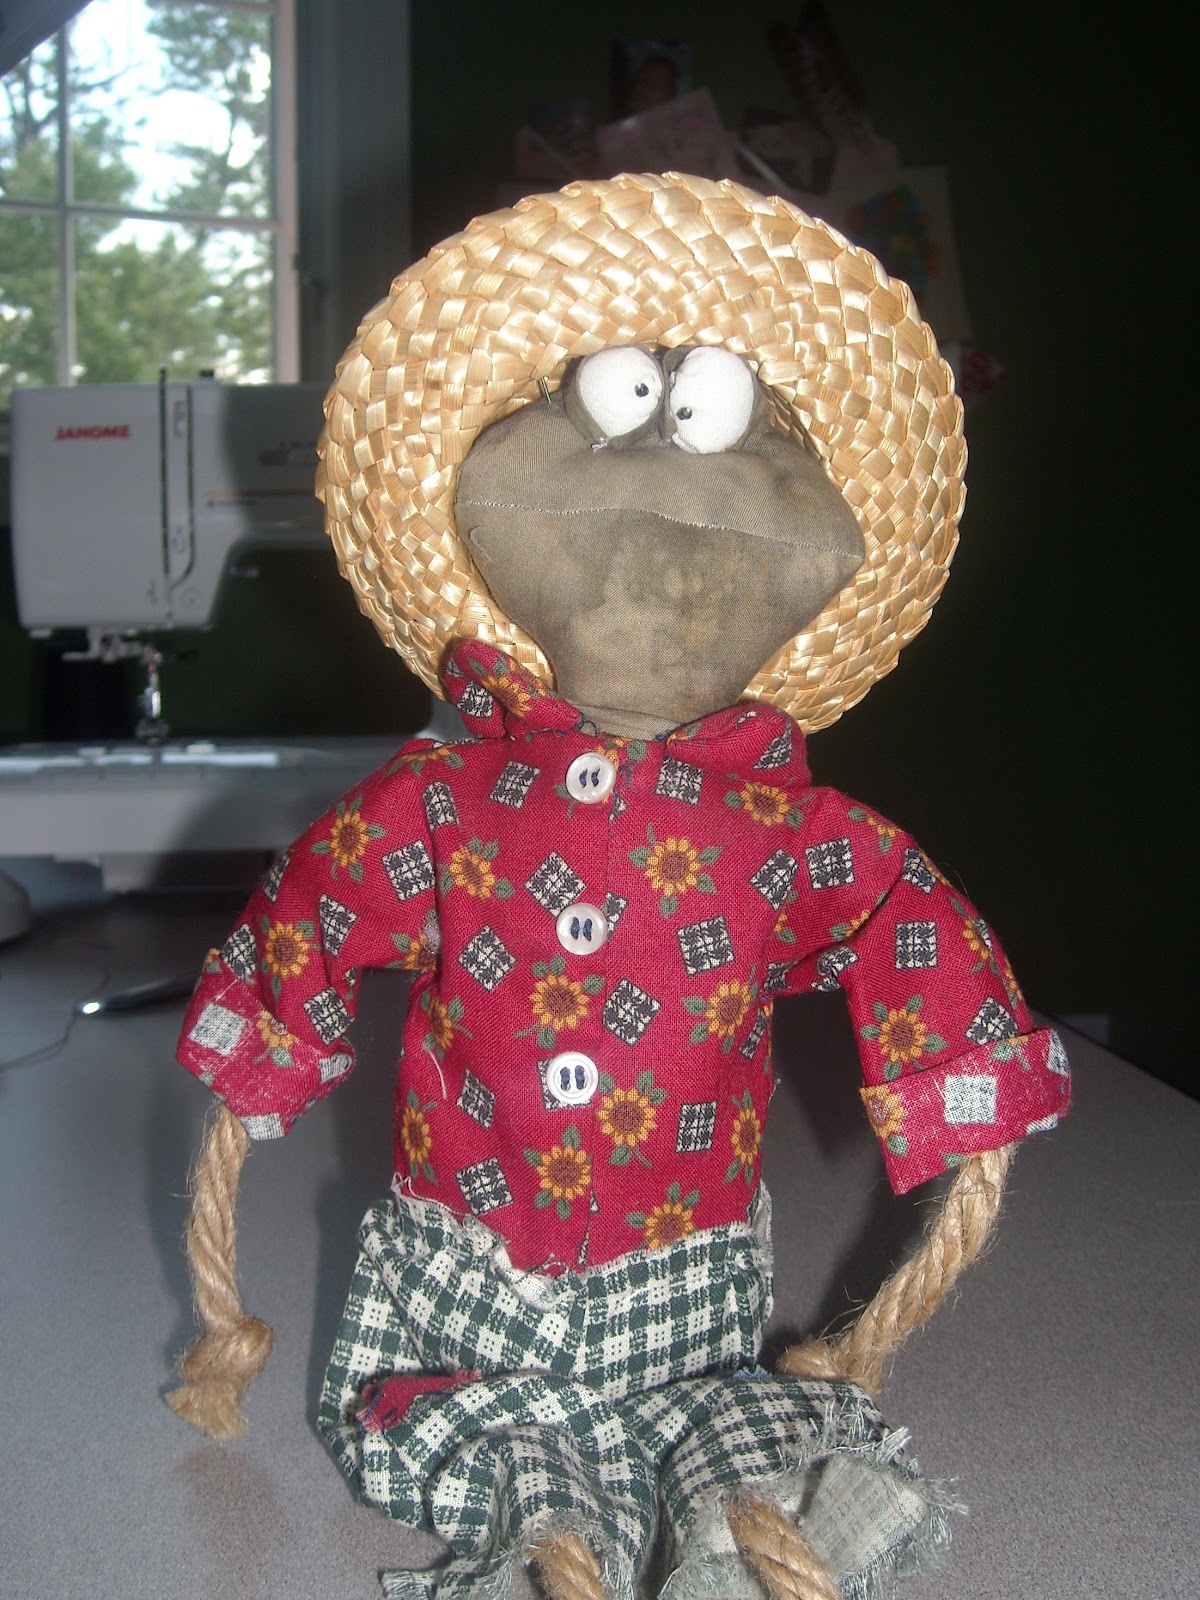
Not sure what is going on with me this week, but frogs have definitely been a mainstay in my creations this week. They are rather cute. This guy was from a pattern I bought a long time ago, started but never finished. It was supposed to be a present for my sister who is crazy for frogs. So if she wants this guy, she is going to have to come for a visit to get it! Ha ha!


He has a mate which is started. Should be another 10 years before I finish her though! Well maybe I can get it done by Christmas.

As a participant in a quilt art blog hop, I am submitting my current work in progress. To check out everyone else participating hop on over to Nina Marie's site


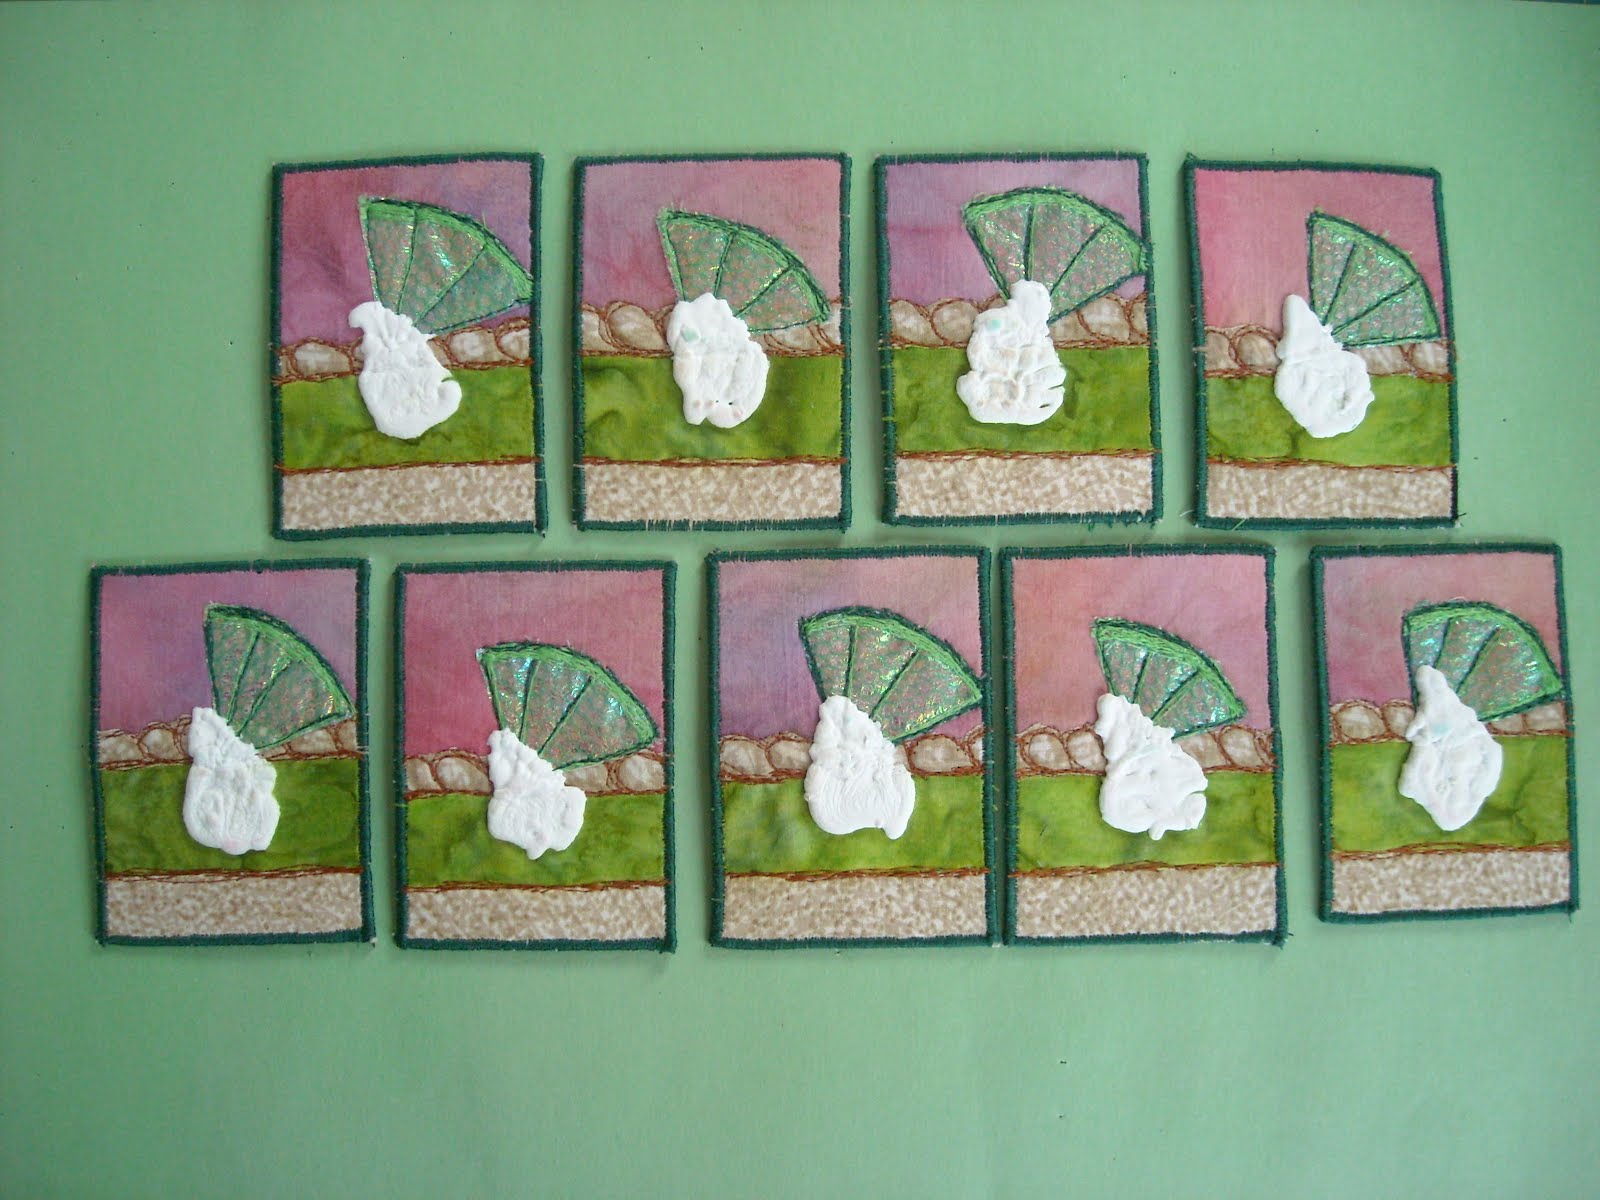
My last frog is actually a set of frogs. I pulled out a piece I had been working and and was in love with. Suddenly, after viewing it hanging up, I hated it. I pulled it off the design wall and buried it like I always do. When I get stuck on a project, I find that stepping away from it for a while will help me gain some perspective. This time it worked. I realized I did not have enough contrast and set about adding in more colors along with the contrast. I was happy when done but it was still missing something. Walking by my daughters african fighting frogs made me realize that was what was needed.
In second grade they learned about the life cycle of a frog and grew them into tiny little frogs. Once the unit was done, the kids were allowed to take some home. They were the size of a thumbnail. We took three which she promptly named Georgie, Gustavo and Fib. They are now the size of a large fist and need a bigger tank!


I spent an evening sketching the little guys. (I say evening because they move around quite a bit.) Once satisfied with the sketches, I traced them on some heavy vellum, cut them out and used it as a template to trace onto a greenish batik. The frogs have spots all over and I wanted a dimensional look, so I put a piece of batting underneath the frogs and free motion quilted around to create the patterning. Colors for the spots where done with fabric markers. The final part was to applique it onto the quilt. Just before sewing it closed, I added some stuffing inside to really pop them off the quilt.
I am loving this piece. I am finally ready to square up and finish it off! It feels so good to create something I love again!

Tuesday, August 14, 2012

Cucumber ATC trade - Cool As . . .


I decided on this little guy because the theme being cucumber meant that you could use all the colors in a cucumber which includes the orange flower! This project started with a sketch of the frog. I used acrylic paint to add color but it was too flat and needed some dimension and texture. I added details using colored pencils. Still kind of flat looking.

Referring back to pictures of the frog, I realized he was kind of shiny. Light bulb moment meant time for the glossy accent! I am glad I bought another bottle. I really love playing with this product! Looking good but still lacking the skin texture. That was solved while digging through my fabric markers for another project (which also includes frogs!) and I found my Puffy Velvet Pen! I haven't used this in a long time and it is supposed to be for fabric. Well rules are for breaking sometimes and I colored in the top half of mr. frog with it. It dried quickly. I love not having to wait. Hit it with a heat gun and wow! I nice rubbery type of texture. But what about the bumpy texture. So I added some dots all over the top and hit it with the heat gun again. Oh yeah!

Here is a side view to help explain what it looked like. Bet you want to reach out and touch it!
It rained all day yesterday so my cards bowed. Sigh.

Wednesday, July 18, 2012

Jonquil ATC

I seriously need to come out of this artistic funk I am in. Between the heat, kids swimming and allergies, I just don't seem to have any creativity left! I have stuff started or swimming in my brain but can't seem to get it moving. So the ATC trade came along and I plowed my way into it.

The trade was the color jonquil but for whatever reason, the flower was just stuck there. So I did what any hard working artist does, I went with it! The background is paper canvas painted with taupe and then a pale green. I used gel medium to adhere small squares of yellows and oranges. Originally this was going to be more abstract. The more I tried, the more it didn't work. So I sketched flowers using dark purple colored pencil and filled in the colors using oil pastels. I have to go play with them some more!  Hmm just had an idea for my Typography challenge!


The flowers were done in various shades of yellows and oranges. The background was with dark purple, sky blue and lime green. I trimmed around each with fancy scissors I swiped from my daughter and then mounted onto dark yellow card stock using orange eyelets. I love punching holes with that! The final touch was some silver, glitter dots in the center. Happy Summer!

Wednesday, June 6, 2012

Dew ATC


This months color choice was Dew. For whatever reason, I had an idea almost immediately and digging through the handmade fabrics, I had the perfect starting point. The fabric was a yellowgreenish color. I took fabric markers and drew leaves all over it with several shades of greens. Then I went in with darker markers around the leaves to make them pop out more. I did a free motion stitch around the leaves in green to add some texture. I cut them apart and drew spider webs on each card. I used Stickles glitter glue to get the sparkles of water or dew on the spider web. After it was dry, I put glossy accents on top of the glitter spots to make it more dimensional and like a drop of dew. I really love how these turned out. Don't forget to check this months entries at our blog Arts In The Cards!

Tuesday, June 5, 2012

More Stuffed "Thumbs?"

I really liked making the one stuffed piece based on a little girls drawing and decided to make a bunch more. I am even thinking of selling them. Me selling my art! This is indeed new to me. I really have to try that some more, otherwise I am going to run out of room in my studio and there really is only so much wall space in a home isn't there?!


I tweaked the design a bit and made them in three colors. Some have curly hair and some have straight! There are several other designs I have made. I just have to move from paper to fabric! Stay tuned!

Monday, May 21, 2012

ATC Turquoise

This trade is by far my favorite! The unique interpretations of this color really blew my mind. Apparently we all enjoyed this color! Check out the others at Arts In The Cards blog. You won't be disappointed!


My turquoise interpretation was of the stone. Have you ever looked closely at the stone? Lots of levels of blues and greens with some brown and black. Using a hand painted fabric of a turquoise water and beach, I added a flour paste resist over the top. I wanted to get the crack like look of the stone. Was this overkill? Probably but it was fun to play. After the resist dried completely, I cracked it into big cracks and some fine ones. Then painted into the cracks with brown dye paint. Once that dried, I had to peel off all the resist. Good thing I made it really thick. It was much easier to pick off but still a lot of work. Once done, I fused the fabric to pellon backing and free motioned stitched over the cracks in a black thread. It looked really flat until I went back in with paint. I painted a light blue green color up to the edges of all the cracks. Then a painted in a slightly darker blue in spots which gave the cards more dimension! Loved it! The final part was to paint a silver edge around each cards and stitch it down. I wanted silver to mimic silver and turquoise jewelry. No single shots this time but if you click on the picture, you can see more of it closeup.

Monday, May 7, 2012

Prayer Flag

Our ATC Revisioned group has posted our next challenge which was to create a prayer flag for spring. Go here to see the rest of the groups finished pieces http://artsinthecardsrevisioned.blogspot.com/Arts In the Cards Revisioned

I always struggle with these types of projects because I hate putting such personal pieces out for the world to see. It's as if you are opening up your heart for all the world to see! I loved the piece until I finished adding the border. It just wasn't the right color I think. I auditioned a bunch of colors and this one was the only one that seemed to kind of work. It just seems too pink for me. But the universe knows what is in my heart and will overlook my bad color choice I believe! LOL


 I started with a piece of white cotton fabric and thought I had cut the size correctly. Apparently not as I will explain shortly. The colors were added with the watercolor crayons drawn on and then blended with water. After it was dry, I wrote words or thoughts onto the background using a dye pen. This whole process was done intuitively. I just went with whatever thought I had on creating and didn't question it. The overwhelming desire to quilt this in rows was too powerful to ignore so that is what I did. I have been wanting to try this out and found myself very pleased with the results.


It has been gray and dreary for well over a week now so my colors are just as dull as the weather. I always believe that thoughts are like prayers and they fly about the universe. So I created free form birds out of fine netting. Thoughts can be positive or negative and sometimes we just down pay attention to where we hold our attention so I made dark and light birds to remind myself to try and think positive thoughts! When I trimmed my piece to size, some areas did not have fabric! So to compensate, I had to make my border much larger than I wanted. Combine that with the color choice and I was suddenly very unhappy.


I tried to offset some of the "pinkiness" with some ribbons and fibers. It kind of reminded me of dream catchers. I added some green beads to represent seeds or my thoughts growing in reality. For now I am done and ready to send it out to the world but I may leave it up on my design wall and think about it some more. A flash of inspiration may strike and I will be able to fix what I imagine to be wrong or I will leave it and spring board off in a new direction.

Monday, April 30, 2012

Kids Drawings

Did you ever look at one of your child's drawings and think that it would make a cute stuffed "animal"? I have on more than one occasion and saved many of my daughters drawings on the idea that I would eventually do that. Well time never permitted. (My son didn't really like drawing much) A few weeks ago, this little girl Abigail brought in a drawing to show me. It was so darned cute and I asked if it was for me. Well in normal Abigail fashion she immediately said no! she was giving it to Miss Keri. She promptly brought it over to Keri and she hung it up. I kept seeing it each day and thinking how cute that would look as a stuffed whatever it was. I snuck it out of the school on Friday!


The original drawing! So cute!


As you can see, the piece was a quick drawing in black marker on newsprint. I took creative liberties and added some color to my final project.

Looks great in color!

Side by side comparison
The body was red felt and I gave it purple hair. The eyes were black fabric fused onto the felt and then hand sewn in place. I embroidered the eyelashes and mouth. The white parts of the eyes were created with white fabric paint.  Of course I showed this to my daughter who immediately asked for it. I told her no and then she wailed on about how I made stuff for other people and never for her blah, blah, blah. So I guess it's time to hunt down those pics I saved of her art and create them in fabric to stop the whining. LOL

Sunday, April 15, 2012

If April Showers . .

bring May Flowers, what do May Flowers bring? The pilgrims! I still remember that joke from my childhood! Corny but cute. So our latest trade was Rain. Rain as a color really stumped me for quite a while. Well until I realized that it really is clear and picks up the colors it lands on. So I used the idea of a driving rain against a window.


I used a hand dyed fabric I made a long time ago in blues, whites and a pale pink. Details were added with watercolor crayons and water. Once dry, more details were added with fabric markers and then free motion stitching in metallic blue. For the highlights and sparkle I used a scrapbooking product called Stickles in star dust (fancy term for off white!) That had to dry overnight. Additional dimension was created with markers in blues and some pinks. I knew it would be impossible to get the sparkle into the photograph but gave it the old college try. This was as good as it gets unfortunately.

Tuesday, March 20, 2012

Sketch to Art Quilt

When I saw the challenge in the Quilting Arts Magazine, I felt compelled to create something. I had done a zentangle sketch and used elements from the peacock to fill in the different areas. It was so cool the way it turned out and I thought it would make a great quilt and look good in color!


This was the sketch I started out using as my idea. I made photocopies of it and experimented with different color combinations.


I sketched the design on white cotton fabric and filled in the areas using, paints, dyes and dye pens.


I free motion stitched in black thread in most areas and hand stitched the smaller areas. Unfortunately it did not make the cut for the challenge. Oh well. I loved doing it! Actually, I loved this so much, that I have started a much larger version of this piece but a few color changes. Can't wait to work on it!

Friday, March 2, 2012

Unconventional Materials

A while back, the QuiltArt list had a call to artists to create an art quilt out of unconventional materials. We had only a month to pull that off. Not sure what there was about this call that grabbed my attention but I immediately had an idea of what I wanted to do. This piece came together in a matter of days! I think it was because I hadn't been doing much art this past year. Life was seriously getting in the way.


I started with a piece of fabric I had been using under my rust dyeing experiments. The material is from my mom. It has a type of rubber backing on it to prevent leakage and reminds me of stuff used in baby's cribs. It had some great rusting but needed a bit more color. So I dug around in the garage and found some old sienna brown glazing paint used for faux finishing. I added that in areas to create more contrast. The plant is modeled after my day lilies after a rain. I painted some thin foam material that had been used to ship some computer stuff to my husband. When dry, I cut various leaves in different lengths. I hand sewed the leaves to the background and had to be really careful not to rip the material. The spider web was made using a hot glue gun. I was going for a web with dew or rain stuck to it. I was happy with the look.


I finished up the piece by sewing on different sized washers onto it. They were to add another element of texture and create more of an earth feel. Viewing the final results, I was pretty happy with the project.

Monday, February 27, 2012

Key Lime Pie ATC

Our theme for this month was LIME. This year, we have deviated a bit from our usual theme and we will only be doing colors. I guess they were sick of my finding a way to make a tree out of every challenge! Just kidding. (But limes grow on trees . . . )


I constructed the pie using a hand dyed pink and purple fabric for background, lime batik for the pie and a cream and light brown for the crust. There was too much of a pattern on the bottom part of the crust so I used a brown dye pen to even it out a bit. I added detail to the crust by using a free motion stitch in rust to add another dimension. The lime was made from fusing a rainbow cellophane from a flower arrangement and green netting together. Free motion stitching in lime green added the details. I then quartered the circles so they would fit on each card. More detail was added using a dark green thread to stitch it to the card. The final piece was to use my favorite puffy paint to make whipped cream. Good thing I made extra pieces to test on because I ruined a couple when I was puffing up the paint!

See the other Lime pieces at Arts In the Cards blog!

Sunday, January 29, 2012

ATC - Red


This year the group is going to do colors for the trades each month. Red is the color for February - how appropriate. My piece is titled PASSION which red always seems to signal to me.
I stamped all over my batik fabric scrap (which was in shades of red, orange and brown) with a handmade stamp. The stamp reminds me of something inside our brain that is all connected. When dry, I placed a red mesh fabric from a floral arrangement, over the entire piece and free motion quilted around the stamp and filled in with different sized circles using black thread. I cut them apart and added Glossy Accents onto the stamped parts to bring out the red. I think this may be one of my favorites! I loved out it turned out.
Don't forget to check out all the others at http://artsinthecards.blogspot.com

Friday, January 6, 2012

ATC - Two


I had to decline participating in our December trade which was a flat Santa trade. They were absolutely adorable. But everything is calming down once again and our January trade was TWO to celebrate our 2nd anniversary. I can't believe we have been doing this for two years already! So many wonderful pieces were traded!
My contribution for the two trade was based on the anniversary and what does one give on the second anniversary. How interesting that it is cotton! So I used cotton fabrics to create little cotton plants to give on our second anniversary. The background was my flour paste resist in blue for the sky, then a metallic green for background plants and a combo rust dyed with tanin on white cotton for the earth colors. I used puffy paint for the plant and cotton balls sewn in for the cotton of course.
I have managed to misplace my camera so a friend was kind enough to use her camera phone to take a picture for me. So no group shot this time around. Sorry