Thursday, December 30, 2010

Snow Dyeing Part 2


One of the blue range. This was mixing blue, another blue and a red purple.


This was a scrap of light green fabric but I suspect it was not 100% cotton. Well I figured that before dyeing but decided to do it anyway! I like the very subtle hints of color.


These two were done with a leaf green but I was almost out of the dye so it was not very strong. But I also added a yellow and blue. These pieces remind me of geodes for some reason.


This is Maddy and my favorite! It has a little bit of all the colors.


These all seemed to be sort of the same so I lumped them together.


And because I could, I added in some white lacy flowers. They remind me of snowflakes so I may have to find a use for them!

Snow Dyeing Part 1


I have always wanted to try this technique but never had the time or thought it was beyond my capabilities. I am not a dyer or a patient person so that does cause problems. But snow was going to be melting because temps are rising into the 50's with rain and thunderstorms - in December in Chicago???!!! I know, crazy right? Couple that with my 9 year old daughter telling me she's bored and I now have the guts to try this out.


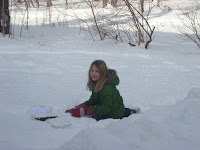
So we rounded up some white t-shirts and scraps of white fabric that I had on hand and off we went. First I soaked everything in the soda ash for 20 minutes or when I remembered it again - whichever came first. Then I put them in the freezer. I read that somewhere, yes I did do some research before starting. Now I get to put the girl to work and she was very happy to do so. She is packing snow on each of the containers and then had a break to chomp on some of the ginormous icicles forming due to the big thaw starting.


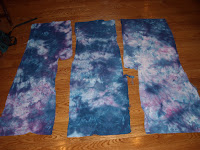
The three containers on the right are the t-shirts and I let Maddy "design" them. She loves this part. She always puts so many colors together I am afraid she will get mud but she always gets astonishingly beautiful pieces! Here they are:


The last is a fabric scrap I dyed using fushia, red and yellow. I ended up washing these out last night after all the snow had melted. Someone told me to let them sit 24 hours and then wash. So I left the blues and greens "cooking" for the full 24 hours. I have them in the washing machine now and will post a little later.

Monday, December 27, 2010

Faux bricks


I found the photos on my iPad. I hadn't transferred them over to my main computer. This was a really big project and took far longer than I had planned. It' s been a while since I've done a project this big.

My neighbors wanted to do a faux brick wall in their formal living room. The side wall was about ten feet and sloped down to eight. The back wall was ten feet high and I don't want to know the width. This technique is sponged on in four colors. The first takes the longest as it has to cover almost all the wall. The next two are time consuming and the final is a breeze as you just hit a few areas. The hardest part was measuring out the bricks and keeping them level and the right size. The process is a little forgiving. Finally, outline each of the bricks in the mortar color and then highlight and shadow each brick. I was exhausted when done but what an awesome looking wall if I do say so myself!

Faux Stone Wall


So I have been back to doing a little faux finishing - this time for a neighbor. I did a brick wall a few months back and will have to upload the photos when I find them! But they were having a party for the holidays and the whole house was being painted and cleaned so they wanted to know if I could slip in and paint this wall in the middle of all the chaos. Sure, why not! I took a few quick shots right after it was finished and could only do the top part of the wall because they had all their stuff in the room I was painting.
I will try to get another full shot later when they have a few moments. There is an elk head that actually hangs on the wall. This should make a very nice backdrop for him.

Thursday, December 23, 2010

Trashin' the Mailman ATC


Our latest trade was to use the junk mail that we receive and create some ATC's. This gave me a chance to try out a cool new technique for image transfer. Take a color brochure and place packing tape over the image. Overlap if you need to. Then rub the whole image to make sure you get a good print. Once that is done, flip over to the backside, run some sandpaper over it to rough up the surface, then use water to remove the paper backing. This will leave you with a print of the image on the packing tape.
I glued this to watercolor paper that had been painted in pinks, blues and purples to match the colors from the brochures. I used gel medium to adhere it. I then pounced some interference blue over the fronts, then stamped with tiny snowflakes in dark blue. Once that was dry, I added another stamp in white in a random pattern and outlined in dark blue marker.
For the big snowflake, I cut out 2 snowflakes from the brochure and then made photocopies in a larger size. I made extras in case I screwed up ; )
I used glitter glue on top of the snowflakes to make them sparkle then cut each one out when the glue dried. I glued one to each card and added Holiday 2010 from another brochure.
Finally I added eyelets and funky yarn to frame the entire piece. They were hard to photograph as they are very shiney.

Check out our ATC blog to see all the other pieces for this challenge:
http://artsinthecards.blogspot.com/

Saturday, December 4, 2010

Typography


Our latest ATC trade was called Typography. We had to incorporate type or letters in any way, shape or form. Of course I immediately decided to use PCOX for my project. It was perfect!

I used watercolor paper and stamped the letters with embossing liquid for the p's and o's and then sprinkled on glitter emobssing powder. Once it was dry, I hit it with a heat gun. The sparkles stayed! Then I stamped c's for the eyes in the peacock feathers and x's were used to create the feet. I painted the feathers with metallic acrylic paints and drew in final details with a black pen. Some of the glitter went on the feet so I am just saying it was nail polish! LOL

Sunday, October 17, 2010

Florida Flora

I can't believe I haven't posted anything since end of August. So sad but I have been busy. Well busy with my kids going back to school, going back to work, my kids various social engagements and soccer season. But I did manage to get a piece done and entered into the Road to California show.


I started out using a photo I took while on vacation in Florida last year. I sketched out the picture using Neocolor Watercolor crayons and then blended using textile medium. I heat set and then added batting and backing. I used various colors of thread to create the lines in the leaves. I first outlined all the large leaves and then stitched to get the patterns. I wanted it to look more like leaves in life than a perfect leaf so pushed the fabric an manipulated it to add a more three dimensional look and feel. So parts of the leaves and stems pop out from the fabric. I added clear beads to simulate the water drops and a few crystal beads for more realistic water droplets. I used fabrico dye pens to add a drop shadow behind for even more dimension.
I think this is one of my favorite pieces. Wish my luck!

Thursday, August 26, 2010

Favorite Quote ATC


I am ahead of schedule for once. Maybe it is because my children went back to school and I have a moment to breathe. I almost feel guilty working on my art. I keep thinking that I should be doing projects around the house. But this two week break is my only time to myself for a very long time. So guilt be gone!!! LOL

So our next challenge was to create something about our favorite quote. Technically it isn't a quote but a line from a song by Jewel "Life Uncommon". Something about this line really struck a cord with me and so I went with it.


This is the first ATC created on paper. I used watercolor paper and added ink in yellow, pink and green. Then I added some gel medium to create some texture and when dry used a deep rose to tone down the colors. I fused a fabric heart onto the paper and added threads using the gel medium. I wanted the viewer to get the sense of emotions tying us up and keeping us from moving forward. I hand wrote the quote in and at the very last minute, I carved a little bird and stamped it onto each card. I seem to have a very yellowy looking card but it isn't quite that color - more golden. But a better representation than cards past!

Friday, August 6, 2010

Lily and Pads


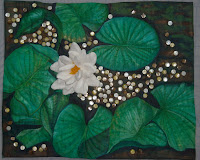
I finished this piece a while ago but was agonizing on how to finish off the edges so I put it off to the side and forgot about it. Lark Books is looking for nature related photos of art quilts for a book series they are looking to do. So while I was looking through all my pieces, I realized that this would be perfect. I decided to just face the piece after consulting my critique group for their opinions. I was surprised they all agreed on no borders! Now that it is complete, I have to agree it looks great.

Call for Consideration
Art Quilt Portfolio – A New Series from Lark Crafts
First volume in the series to be published Spring 2012

Art Quilt Portfolio: The Natural World
An Inspiring Collection of Art Quilts
By Martha Sielman

So here is one of the pieces I submitted for consideration. I painted the fabric and then added details with dye pens and shiva paintstiks. I hand quilted around all the leaves because I wanted it to puff out - thinking it would add to the 3 dimensional look (it did!). The lily is three dimensional. I created a petal template and cut 2 different types of white fabric, stitched around and then reversed out to put the seams inside. I layered and stitched them in place. The center is done with embroidery threads. I beaded the background to add additional texture.

I really feel good about this piece. Wish me luck!

Monday, August 2, 2010

This and That


Well I have not been as busy as I would like to be creating art but I haven't been a total slacker either. I just finished my ATC's for the latest trade - Sew What's Buggin' You? Mine are dragonflies! The write up for them is on the blog - http://artsinthecards.blogspot.com/

I am also working to get some pieces ready for submission to Art O Mat. I have two ideas but need to get them sent off and have them ok'd before I post pics. Wish me luck!

Friday, June 25, 2010

Art In the Cards Trading Group

I was invited to join an ATC group a few months back and you have seen the pieces that I have done. Well now we are doing a blog so that you can see what the whole group is doing. Some pretty amazing pieces are coming out of such a tiny group! We will be starting with our All Cracked Up theme and going forward from there. I am thinking we should post our other pieces too because they are amazing!! Anyway, here is the link if you want to check it out!

http://artsinthecards.blogspot.com/

Tuesday, June 22, 2010

Cracked


So our artist trading card group had another challenge and the theme was Cracked. Hmmm. I decided I was going to do mine based on the Crack of Dawn!

So I used backings from a previous failed ATC attempt. I painted the fabric midnight blue and then went back into it with shiva paintstiks in yellow, orange and green. I sewed around the "clouds" to add more definition. I then drew on some yupo paper with colored pencils and ink. Once dry, I painted over it with gel medium in three layers. Once dry, I used gel medium to adhere it to the backing. It wasn't as transparent as I wanted. So I had to add more details back in with fabric dye pens. It has a rubbery feel to it and was hard to sew the edges to finish off the piece. The 6:08 is the time my husband keeps waking me up for some reason!

Thursday, June 10, 2010

Rebirth Challenge piece


Well I have finished the third piece in our 12"x 12" challenge series. The theme this time was Rebirth and it could be interpreted any way we wanted. I created mine based on the butterfly. When the challenge word was revealed, we had just received our caterpillars at the preschool and we watched each day as they got bigger and then went into the cocoon stage.

I found some great fabric my friend Christine had given me and used it for the background. I quilted around the piece to give the feel of tree bark. I used rust dyed and hand dyed fabric to create tree branches. The leaves were two fabrics fused together and then cut out to look like leaves. The cocoon was from more fabric my friend Christine gave me - she thought it looked like mud and I of course said I would take it! I added some angelina fiber over the top and machine quilted it to add more texture. I then stuffed it with fiber. I created the butterfly wings by fusing to pieces of white fabric together and then drawing in the wing patterns using fabric markers. The edges were faced so there would not be a border (I hate making borders if you haven't noticed!! LOL)

Sunday, May 16, 2010

Waiting


I have made an entry for the Stitch This! Challenge. Quilting Arts and Bernina are hosting. You can vote for as many pieces as you like but you can only vote one time for each.

I saw the photo and just fell in love with it so I had to enter. Not sure why but I really like swans. The challenge was to interpret the picture posted but showcase stitching. Uploads were to begin on May 3rd but I found out about it on May 5th. So I got to work and started creating!

First I drew the image on to white cotton fabric. I used the Neocolor II watercolor pencils and then blended the colors using the textile medium. Terri Stegmiller had used this instead of water so I decided to give it a try! LOVE IT!!! Going to do this again! Anyway, I then thread painted the entire piece. The feathers at the bottom were thread painted on separate fabric and then cut out and added to the piece. I love the colors and the entire piece.

Wish me luck!

Wednesday, May 12, 2010

Rust/Metal ATC Trade


I did these in half the time as last. Some designs take time and others just flow out quickly. Our challenge was to incorporate something rust or metal. I used rusted fabric. I was inspired by my visit to the Field Museum in Chicago and took a bunch of photos of the fossils. The fish grabbed my attention so that was my inspiration. I made 8 up on a page and printed out on my color ink jet printer. Then I photocopied it on a copier. Each fish is printed on the card using the citra-solv method. I found the lavendar version at the IQA show in Jane Davila's booth. I wanted to make them look like they do in the museum - saved in the rock they found them. Didn't quite work so I added black puffy paint to add dimensionality to them. I stitched around each and then FMQ the background to make it look like a rock. Didn't really work but I do like the fishes!

Sunday, April 25, 2010

Warped Challenge


Finally finished my ATC's for the latest challenge and I am about 10 days behind schedule. What can I say. Life.

Anyway, I was inspired by the meteor that flew over Illinois and landed in Wisconsin, as well as time warp and the images of the volcano from above. So I was thinking "What if a meteor ripped through the fabric of time?"

I painted white fabric with black puffy paint, let it dry and then puffed with heat gun. I then painted the "islands brown and green and the water around in various shades of blue. I painted a thin lutrador with midnight blue acrylic paint and smeared a glitter glue in areas across it to simulate space and stars.

When dry, I sewed to the top of each card and hit it with a heat gun to "Tear" through the sky. I added some small silver beads to create little meteors and then a silver washer - hand numbered to make a clock and had a small white cardboard circle behind it. I edged each with black/blue thread.

Sunday, March 21, 2010

Something New ATC trade


I have added my new ATC trade. We were supposed to do something new. I used some hand dyed blue fabric as the background and then painted some shiva white onto the background to create clouds. I then fused white on for the trees and the snow. I machine quilted around the trees with black and free stitched additional trees. I had wanted to do something that was "sketched in black" for some time and this was the perfect time to try out the technique. I hand beaded for some leaves and painted some glitter glue onto the snow to make it sparkle! I love how these turned out - especially since my first attempt had to be put away because I hated how they looked. I will think about them and used them another time.

Saturday, March 6, 2010

Ghostly Galleon


My latest piece was created for the Fiberart Challenge group. The word was poetic. I took my inspiration from the poem The Highwayman. The line "the moon was a ghostly galleon tossed upon cloudy seas," came to mind. The moon has inspired poets, writers and artists for centuries.

I just love how this one just came to life on it's own. I used commercially dyed blue and white fabric. The moon and the snow was done with shiva paintstiks and then I machine quilted it.

Sunday, February 14, 2010

Going Green ATC Trade

I am actually early on my next trade. It isn't due until March 1st but Hubby's birthday is next weekend and the weekend after, I have to go on a girl scout camping trip. So this was it for me to get them done. I am really excited how they turned out but my photography is not so great.


The background is a paper towel I used to soak up excess dye during my summer experimentation with daughter and friend. I thought the colors were cool so I kept them. They were perfect for this challenge. I stamped a fern type pattern on each with a hand cut stamp. Then machine quilted around to accent them. I added some left over angelina fibers and some green netting I had on hand from a lime bag. They make great grasses! I sewed over them with some thread to make blades of grass. I added some sequins and beads for a little extra something and then finished the edges. I am really happy with these and have 3 left over!

Sunday, February 7, 2010

Comfort


The Fiberarts Group I belong to had a challenge. Every two months, we will get a new theme to work with. Our first was Comfort and what it means to you. I am late getting my entry in as I am getting over a nasty sinus infection and the in-laws have swooped in for an impromptu visit. Was supposed to be two weeks but is going to be 4. I love them to pieces but the little time I have to work on art has been whittled down to near extinct. Oh well.

So my entry was born out of a small snow storm that we had. There is something very peaceful about the world blanketed with snow. (Not the 30 inches in DC mind you) but a few inches that makes you stay home and hang out with your family.

I used some fabric from a previous experiment. I drew the background with Neocolors watercolor crayons and then added water to blend. When dry, I used various rubber stamps of trees and leaves and grasses to create the treeline. I placed the stamp underneath and rubbed using the same water color crayons. I misted them with water to let them bleed and blend a little and then quickly ironed the fabric (from behind) to heat set and stop them from disappearing all together. I thread painted the trees and grasses. I also added angelina fibers to create the snow in the foreground. The tree in the middle was beaded with some metallic beads to add some texture.

I still feel it needs something in the lower right hand corner. I wanted to add some tall grasses but my hubby thinks it looks great the way it is. What do you think?

Monday, February 1, 2010

ATC Challenge - Red


I was invited to join a small Artist Trading Group and we just finished our first trade. The challenge was the color red. Originally I was thinking Valentine's Day but that was so obvious. But then I ran across some Chinese envelopes I had in a drawer and the inspiration took hold. This year, Chinese New Year lands on Valentine's Day! So I created ATC's based on the year of the Metal Tiger which is this year's animal.

First I used a red fabric background and stamped a chinese character in dark blue. Then stamped some other oriental motifs in cold and a darker red. I then used a puffy paint to paint individual tigers on each card. When dry, I used a heat gun to puff them up and then painted them copper using H20 watercolor paints. When that dried, I added in details and stripes with a dye pen. The pen with the H20 paint trashed two of my black pens. Apparently they don't play nice together. So note to self, don't do that again. I sewed a Chinese coin onto each and finished the edges with a satin stitch in black.

I made 8 so that I could pick the best of the bunch for my trade which included only 5 people. So I have 3 left but need to do some adjustments to the faces.

Saturday, January 2, 2010

Rust Dyed Challenge entry


Well I finished it finally!!! I had some technical difficulties and kept putting it off to the side while I figured out how to fix it.


Here is a closeup of the face.

Not sure I posted this in a previous post but here is a quick explanation of this piece. The face is my father's. I used a photo my BIL John Armentrout took of him (he gave me permission to use!) My father was diagnosed with hepatic cancer right around the time hawks entered my life. I first had a visit in my back yard - he landed on my trampoline! The next day I found out he had cancer. From then on, they started to show up all time. On the day of his death, I was driving down the tollway to see him and they were everywhere on my entire drive down to my parents house. Since then I have always associated the hawks with my rather. So I titled this piece - They Came To Take Him Home.


The fabric was rust dyed and then the birds were sketched in with pentel fabric crayons. I painted the background in blue using setacolor mixed with aloe gel to thin it. I thread painted the birds and face. I didn't use a stiffer backing behind the face as I wanted to create the wrinkles without having to stitch every last one in. The result was great but puckered and didn't lay flat. I painted the background again using shiva paintstiks in blue and white to blend in a little more. Then I used a trapunto technique to fill out the face more and stabilized the back of his head. There are still some puckers but overall I am thrilled with the final result.